
It's been a long while since I've posted a personal procrastineering project. The past two and half years have been pretty heads down with developing Kinect (congrats to all those involved). But, since that has now successfully launched. I've had a some time to spend on little side projects.
As an exercise to teach myself a little bit more real-time computer vision/robotics, I wanted to see if I could get a computer to autonomously play certain console video games. Video games are nice because they can provide a relatively decent simulation of a 3D environment, emphasize demand for real-time vision processing, I don't have to go out in the field to run a test, and there is no penalty for screwing up. This could also be done with PC games, but rich games are more often console based and it kind of black boxes the activity so I am really forced to depend solely on the data contained in the video stream.
However, a pre-requisite to this activity is programmatically sending controller commands to a console. This is not something that appears to be very common on the intertubes, so I thought I would detail my efforts here to hopefully fill that gap. There used to be a product that would allow you to do this with an Xbox 360 called the XIM2. It was primarily targeting people who wanted to use a mouse and keyboard to play first person shooters on a console. Unfortunately, the XIM2 is now discontinued and the nice looking soon-to-be-available XIM3, I'm told, will not have PC-to-Console control functionality, bummer. So, off to build my own.
The approach I ended up taking is actually very similar to the origins of the XIM. I used a microcontroller to simulate a PS2 controller. The nice thing about the PS2 controller is that it is a relatively simple communication protocol, and due to its vast popularity you can find low-cost adapters to use it with a PS3 or Xbox 360. These are each the order of $5-$10. So by creating a computer controlled PS2 controller, you can support 3 consoles. So, you can programmatically control current generation games as well.
Simulating a controller
Most of my starting points were nice websites such as this and this, which neatly describes the Playstation controller protocol. Most of the material online is geared toward using a PS2 controller with your hobby/robot projects rather than trying to simulate a PS2 controller to command the console. In theory, you simply would reverse the instructions and it would magically work. Unfortunately, that wasn't quite the case. The PS2 console is very picky (sometimes erratic) about timing, goes through a reasonably sophisticated handshaking and configuration process when you plug it in (which is game dependent) before it will accept data from the controller as input. Thus, my controller simulator had to survive that entire start up process looking like a valid controller.
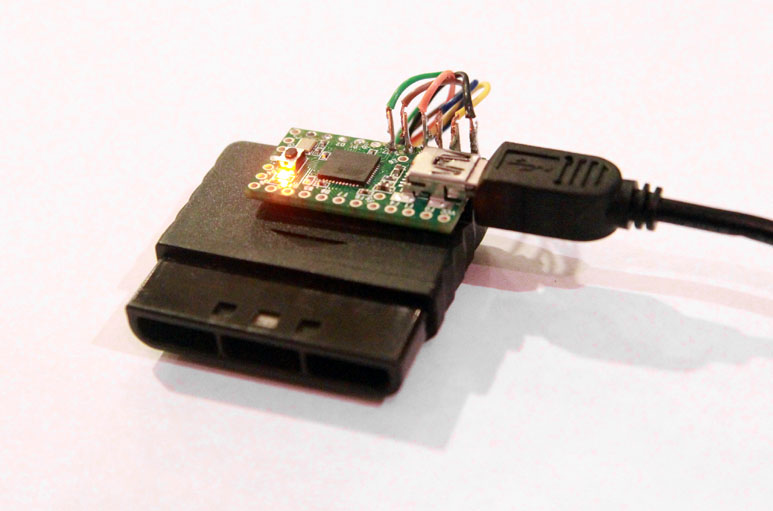
The microcontroller platform I chose was the Teensy 2.0 USB development board which has an ATMEGA32U4 and is programmable via the built-in USB port (so, no external programmer needed). It can be configured to become a variety of USB devices and is only $18. Since it can become a USB serial interface and has hardware for SPI (for the PS2 controller protocol), it can do this entire project without any additional communication hardware.
The PS2 controllers use the SPI protocol for communicating with the console, typically using a transmission clock of 250KHz. But, SOME games, will cause it to shift to 500KHz unexpectedly between messages. So, hardware SPI is a must in the microcontroller. BTW, if you are selecting a different micro, you need to make sure you can simultaneously clock data out as new data is clocked in. Lastly, you need to manually pull the ACK pin low to tell the console something is listening on the line which isn't part of the standard SPI spec.
The PS2 controller initially boots up as a simple Playstation One controller which only provides digital button output (mode 0x41). The game console will make a variety of queries and configuration messages to enable the joysticks, analog button pressure, motors, etc. (mode 0x79) It's unclear what all of the configuration message mean. There are a lot of them, and they vary quite a bit depending on what game is running. Not very simple. But, as long as you mimic the behavior of a valid controller under several games, it appears to work. There was a minor issue that the USB interrupts were causing de-synchronization between the console and micro. So, the USB interrupt handling is disabled while communicating with the console (which is roughly 100us every 15ms). This did not cause an issue with my computers, but may be one possible source of USB errors on other systems just as an FYI.
Firmware Files
Teensy PS2 Controller Sim Firmware v1
Teensy PS2 Controller Sim Firmware v2 (updated 5/10/11)
- fixed ACK timing bug to make it work with PS3 and Xbox360 adapters.
I won't dive into the details, but above are the firmware files for the Teensy development board. These are (of course) provided at your own risk with no implication of support. There is a precompiled .hex file which you can point your Teensy programmer toward that should get you up and running quickly. The C source is in there. For those of you who are industrious, also provided are logs of the SPI messages sent between a PS2 and a valid controller for a few different games.
It's worth noting that I probably didn't have to make such a thorough simulation of a valid controller to work with the PS3 or Xbox 360 adapter since they are likely much simpler and less varied in their setup handshaking. But, I wanted to use my PS2 since it is just laying around and a better simulation would increase the likelihood some random PS3 or Xbox 360 adapter will work.
Wiring
Wiring the Teensy is pretty easy. You need a PS2 cable (from an old controller or extension cable) that you are willing to cut and solder. This only requires 6 wires, detailed in the picture below. I read online that if you bought a cheap knock-off cable, the color coding may not match. So, refer to this pinout diagram if you are unsure.

Program your Teensy with the .hex file in the archive provided, and the LED should begin to blink in "search mode". When you plug in the PS2 connector to the console (while the USB side is connected to your PC since it is USB powered), the LED should go solid but slightly dim. This means it is steadily chatting with the console. If it is flickering without your involvement, that means it is struggling to pass the setup handshake and you should feel free to debug that problem on your own. =o) It seems to work on my PS2 and my PS3(via adapter). I haven't gotten a Xbox 360 adapter yet, but I'm optimistic this will work assuming the adapter works at all.
Sending commands
As I mentioned, the Teensy 2.0 can be configured to provide a USB serial interface. If you are using Windows, you need to download these drivers. Mac and Linux don't need drivers. Now, a serial port should appear in your device list. Any programming environment that can access a serial port can now send button presses to the game console. When you do send a message, the LED on the Teensy will blink bright.
The Teensy is expecting 7 byte messages of the format:
0x5A (buttons1) (buttons2) (joyRX) (joyRY) (joyLX) (joyLY)
Here is a Windows C++ header file that might be helpful in formalizing the following:
Joystick neutral is 0x80, up and left are 0x00.
These are the bit masks for the two button bytes, which should be set to 0 when pressed, set 1 otherwise:
Buttons1:
PS2Button_Select = 0x01,
PS2Button_L3 = 0x02,
PS2Button_R3 = 0x04,
PS2Button_Start = 0x08,
PS2Button_Up = 0x10,
PS2Button_Right = 0x20,
PS2Button_Down = 0x40,
PS2Button_Left = 0x80,
Buttons2:
PS2Button_L2 = 0x01,
PS2Button_R2 = 0x02,
PS2Button_L1 = 0x04,
PS2Button_R1 = 0x08,
PS2Button_Triangle = 0x10,
PS2Button_Circle = 0x20,
PS2Button_Cross = 0x40,
PS2Button_Square = 0x80,
The starting 0x5A byte is used as a start byte to help segment message packets. If you send data without prepending with this byte, you will get 'x' characters sent back to you on the serial port which is the microcontroller complaining your messages aren't formatted correctly.
Autonomously Playing Guitar Hero
As I mentioned at the beginning of the post, the whole purpose of this project was to see if I could analyze the video stream from the game console to autonomously play the game. Arguably one of the easiest games to automate is Guitar Hero, which basically turned millions of willing people into bad midi file readers. So, I'm about to use a lot more processing power and hardware to also make a bad midi file reader. =o) In case it wasn't clear from my description above, this is a flow chart of what is going on here:

The Playstation spits out the video image, the PC analyzes that image, and then sends controller events back to the Playstation. Now, this may seem absolutely absurd to a normal human being. But, I'm an engineer at heart and this makes total sense to me. The nice thing is that assuming I can make the "analyze that image" software infinitely smart, I can hopefully play all sorts of games autonomously - perhaps even driving games, first person shooters, or platformers. Doing all that will be tough, but I'll learn a lot in the process. Some of that may even be useful for analyzing things in the real world as well. But, for now, lets just start with Guitar Hero on Expert mode.
For video capture, I'm just using a $30 USB capture device. Since real-time processing was priority for me, 640x480 images @ 30Hz is plenty of resolution to start with. In fact, for this starter project, I'm just using 320x240. For a computer vision library I am using OpenCV. Although it has some eccentrcities, it is a very powerful toolkit for getting up and running quickly. I'm not going to go into too much detail about OpenCV. But roughly, what I do for playing Guitar Hero is:
1. Unwarp the fret board so it is square (using a homography)
2. Use a template match to find notes along each column.
3. Track notes over time to ensure they are not spurrious.
4. Once notes hit a trigger line, queue the button press.
There are a bunch more subtle details to make it work just right. It seems to work pretty well hitting 95% of the notes on expert mode. It doesn't really handle star notes, sustains, star power, or other weird special effects. But, it can finish all the songs on Expert Mode. Thanks to the simple UI design of "just hit the X button to advance", it can play the entire Career mode from start to finish without me touching it. Here's a video of it finishing the last rift of the last expert song.
For those extremely interested, here is a copy of the OpenCV project that does this. This is DEFINITELY provided without any support and requires getting OpenCV installed and running.
Thursday, December 16, 2010
Simulated PS2 Controller for Autonomously playing Guitar Hero
![]()
Subscribe to:
Post Comments (Atom)


No comments:
Post a Comment